User Manual
Apr 2, 2024
Server General Inc
Server General™ Agent
Introduction
The Server General Data Security service consists of two components - the “Server General Agent” (“SGA”) that you install on the target server e.g. on your MongoDB, MySQL, or your file server, and a key locker called the “Server General Locker” (SGL). Your target server can be located on any public or private cloud. Your keys will be stored in the SGL. Only you know the master passphrase which is used to wrap the encryption key.
Assumptions
-
You will be installing our encryption agent, SGA, on your target server.
-
You have a valid license.
-
The target server is a fully functional server running either of the specified OS: Ubuntu Server 18.04, 20.04, 22.04, CentOS 7.x, 8.x, 9.x or RHEL 7.x, 8.x, 9.x
-
You have “root” privileges on the above-mentioned server.
-
You are looking to encrypt the sensitive data sets and control access to them.
OS Requirements
Supported Linux Distributions
- Ubuntu™ Pro 18.04 server
- Ubuntu™ 18.04 server
- Ubuntu™ 20.04 server
- Ubuntu™ 22.04 server
- Red Hat™ 7.x
- Red Hat™ 8.x
- Red Hat™ 9.x
- CentOS™ 7.x
- CentOS™ 8.x
- CentOS™ 9.x
Internet Access
The SGA (our agent) deployed on your server will need to initiate a TCP connection over port 443 (HTTPS) to Server General Lockers, logging servers, and our update servers deployed within our network. Please make sure that such access is available before starting with the installation.
Downtime Requirement
Please plan for a scheduled downtime as your data will not be accessible during the encryption process. The time required to encrypt your data will depend on many factors such as the size of the data set, the CPU speed, and available memory within your server.
Administrative Access
All Server General commands require “root” access. The initial installation and configuration also require privileged access.
Disk Space
Please make sure that you have more than twice the disk space available in your temp directory as the size of the data that you want to encrypt. You can also point your temp directory to any partition that has available space by setting up your environmental variable.
Installation
1. Preparing your server for the SGA installation
1.1 Update your system
$ ssh -l<user-id> <IP Address of your target server>
$ sudo apt-get update

$ sudo apt-get upgrade
1.2 Add additional system users who will manage critical data sets
In this step, you’ll add additional system users who require access to the sensitive data sets in clear text. If these users already exist in your /etc/passwd file and are part of the group “sudo”, then you can skip this step. Otherwise please follow the following steps to add these users.
Note: Generally you don’t need to do this and in fact, you should limit access to as few people as possible.
Adding additional users:
$ sudo adduser --ingroup sudo <login-id>
<login-id> = jcuts (Let’s assume that you are planning to allow this user to access the MySQL data in addition to the MySQL user.)
Note: Please note it’s more secure to use an SSH key pair for the system users who will be granted access to the protected data sets later.
$ sudo adduser --ingroup sudo <login-id>
<login-id> = jcuts
1.3 Check MySQL
The assumption is that you are trying to secure your MySQL server. Make sure that your application server (MySQL) is already installed on the target server.
$ sudo apt-get install mysql-server
Note: There are no technical limitations that would limit your ability to use the Server General Data Encryption Solution for other databases or file servers.
1.4 Download the SGA installation file
-
Download “sga-install” suitable for your server from www.servergeneral.com.
-
Copy the “sga-install” file over to your target server but first create a directory called “sga” on your server.
-
$ sudo mkdir /root/sga -
$ scp sga-install root@<IP address of the target machine>:/root/sga/
1.5 Check file permissions
Make sure that the sga-install file is executable. If it’s not, then change permissions:
$ sudo chmod +x sga-install.sh
2. Server General Agent Installation
2.1 Install SGA
Note: All SGA commands will be executed in the context of the “sgadmin” user (see 2.3)
$ sudo ./sga-install
The SGA is a role-based encryption and access control agent. The agent implements security policies defined by you. During the installation of the SGA, we’ll initialize a special user called “sgadmin”. All SGA commands are issued in the context of this user. For security reasons, we’ll create an SSH key pair for this user during installation. You will be asked to enter a passphrase to protect the private key of the “sgadmin” user. At the end of the installation, the private key of the “sgadmin” user will be displayed on the console of your target server. You must copy this key to your workstation which will be used to access the target server later. The use of the SSH key pair is optional in the latest release.
Here is a screenshot of the SGA being installed on an Ubuntu machine (please note that we update our agent continuously and hence your screenshot might look different):
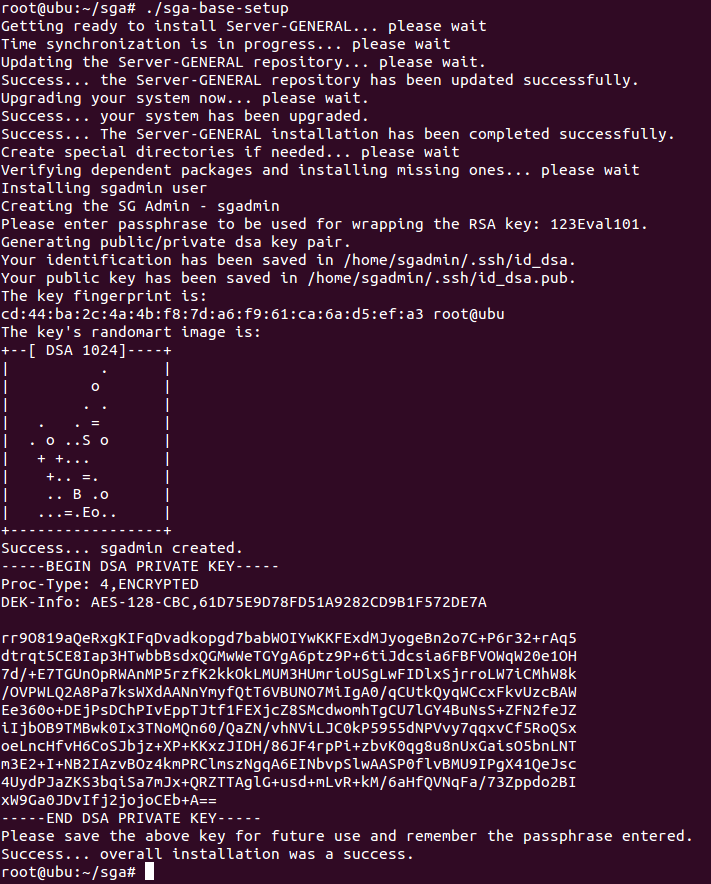
It will only take a few minutes to install the SGA. The entire process is completely automated.
2.2 Saving the “sgadmin” private key
The installation script will create a special user “sgadmin” as mentioned above. You must copy the private key over to your workstation that will be used to gain shell access to the target server. You can open up your favorite editor on your workstation and just cut and paste the key.
Here is an example of a key:
-----BEGIN DSA PRIVATE KEY-----

Proc-Type: 4, ENCRYPTED

DEK-Info: AES-128-CBC,2C19D69E595EAAF18B067EB7AEA69551


BqwFBwi+5T3xGMR6cRDj7swF/yL2DjdFCiH86doO82qWVr9/D40prf/sMBZXzInD

muYiPz4UQJttWC1ZEIjYYnNG9khhs6IRo3tHN5IUpEeBMAO//2Hcyn3mFPyhb0nT

6PdBIJwBaEUhFMfY+no4e+yovPEyrVqCba3BE8YEFm7i+9PrRL5o/hKna8w8/X6V

vb+5FrUA6Eg6eoIt7Xqh24LJAlvmASMN/aF72L85zI2Z9Sy7hOdmTt4kOICj/5gd

Ei8q/jgymzQHy+ToDrQV3I8QEu0HJu2EgzMx9evPR9sLE4tkNMNdR03hJmUaRhxi

w9ZHRqx79ruZIHUaiGcWh1rPk12JY2hxMKIB8S3RBwbcOJ+qHaaJKIJ9vKXWVVDp

rMeC7tWU58PsPF1YcQVSEPp8T+6+Qi0pMT5Hkb5XiYHVdEeaDW0Z4ztCYZu1jsTb

AguIv+jE8X2+gz0FJa5A2X1sFQ8QUproT3QY2YZ1cYZLL2ZRF5RuP8At8bPvzukb

W/k4gLPrReLtDV2NxrA8OpPpu+5COlUuJa9LPLE3i3Nmy8zFB+rdY7SYOZyAZbA7

mOsq296Yf4KbcI0xNqkX+Q==

-----END DSA PRIVATE KEY-----
Let’s rename the private key file as sgadmin.key and set the permissions to read-only using the following command:
# mv id_des sgadmin.key
chmod 400 sgadmin.key
Next, you must delete the private key from the target server.
Note: You must store the private key for the “sgadmin” user on your personal workstation that will be used to log into the target server.
rm /home/sgadmin/.ssh/id_des
You should make sure that you do not delete the id_dsa.pub otherwise you will not be able to log back into your target server.
The SGA installation is now complete!!!
2.3 Login as the “sgadmin” user
Next, you will use the private key to log into the target server as the “sgadmin” user from your workstation. If you are already logged into your target server, you must log out and log back in as “sgadmin”. Do not try to “su” to the “sgadmin” users. It won’t work. We are also assuming that no other users are logged into your target server.
$ ssh -i <path to your sgadmin.key key> sgadmin@<IP address of your target server>
$ whoami
It should say “sgadmin”. If it doesn’t, then please log back in as “sgadmin”.
$ sudo srvg -h
You will see a full list of the SGA commands if your SGA is properly installed.
2.4 License Your SGA
The very first thing you need to do after installing the SGA is to license it before proceeding with the configuration. You will not be able to execute any of the SGA commands unless this step is completed successfully.
Use the following command to license Server General on your target server:
$ sudo srvg license-add [-l <license-key>]
What is a SGA Security Policy?
A security policy is a configuration file that defines various parameters that are used to protect the sensitive information.
You need to accept the Server General subscription agreement.
Note: Please note that your license controls the number of repositories (data paths e.g. /var/lib/mysql is a data path that requires a repository and /var/log/mysql is another data path that requires a different repository) that are allowed to be protected using the SGA on your target server. However, there are no restrictions on the number of security policies or on the number of Data Administrators (we’ll talk about various roles later in this document). If you need more repositories, then please contact us.
You can only upgrade a license after it has been used to license a machine. Only licenses that are in use can be upgraded. So you must first use the license to license your machine and then request an upgrade.
The SGA Configuration
3. Adding the SGA Administrative Users
The Server General Data Encryption solution uses role-based access control mechanisms to protect sensitive data files from unauthorized access and against many types of OS-based attacks. These added controls do not interfere with the normal access control features provided by your application server i.e. a MySQL server or MongoDB server. All normal interactions between your application server (MySQL or MongoDB), DBAs, and its users are controlled by the application server i.e. your MySQL/MongoDB server. The added controls offered by Server General simply augment the application’s access-control mechanisms. To do this the Server General Data Encryption service introduces three separate roles of its own - the role of a Security Officer or SO. This role is played by someone who is going to be overall in charge of the Server General installation on a given server. The Security Officer leaves day-to-day operations to trusted parties called Data Administrators (DA). The system users who need access to sensitive files are called SG users (SGU). Only the DA can grant SGU access to a protected directory.
Please read the section below labeled “Access Controls” to better understand various roles and their responsibilities.
3.1 Add Security Officer
The Security Officer (SO) is a role that is played by your CSO or CIO of an organization. The SO is not responsible for day-to-day operations. There is only one SO per server. Sample configuration files for this and other roles are stored in the “/etc/serverg/examples/admins” directory.
Note: You should edit the example Security Officer configuration file now to suit your needs.
You should edit the following parameters in this file to customize your setup:
“so_fname”, “so_lname”, “so_email”, “so_phone” etc.
Here is a sample Security Officer configuration file:
lang=Eng

Security Officer's user ID
so_id=SecOfficer1

Security Officer's first name
so_fname=George

Security Officer's last name
so_lname=Patton

Security Officer's email address
[email protected]

Security Officer's telephone number
so_phone=650-485-1415
$ vi /etc/serverg/examples/admins/security_officer.conf
Please make sure that you have finished making changes to your “security_officer.conf” file before proceeding with the next command.
$ sudo srvg so-add -c /etc/serverg/examples/admins/security_officer.conf

The Security Officer must type in an alphanumeric string of 16 characters or more as his/her Security Officer’s Master Key (SMK). We’ll use ‘123456789012345so’ as an example. Please do not use this string to set up the SO.
NOTE: THE SECURITY OFFICER MUST WRITE DOWN HIS/HER SMK ON A PIECE OF PAPER AND PUT IT IN A SECURE LOCATION. WE DO NOT STORE YOUR SMK ANYWHERE AND HENCE WE WILL NOT BE ABLE TO HELP RECOVER IT. THERE ARE NO BACK DOORS. IF YOU LOSE THE SMK, WE WILL NOT BE ABLE TO HELP YOU.
3.2 Add Data Administrator
Note: You should edit the example Data Admin file to suit your needs.
The Data Administrator (DA) is responsible for managing a given data set. Think of a DA as a custodian of sensitive files. You can define multiple DAs e.g. one for your MySQL database another for your Apache server and yet a third one for your flat files. There are no limits on the number of DAs on a given server.
Only the SO can initialize a new DA. Proper judgment should be exercised when selecting a candidate to play this role as we can not protect against a malicious DA (a malicious DA is not part of our threat model). The DA is fully authorized to select different security attributes to ensure the safety of your sensitive information. For example, the DA decides which encryption algorithm to use to encrypt data sets, which directories to encrypt, and which SGU to grant access to.
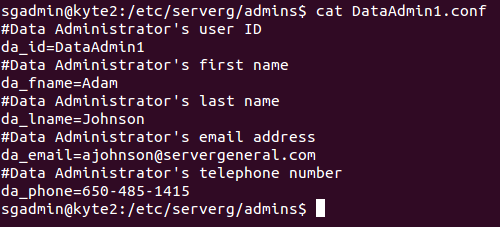
Here is how a sample Data Admin configuration looks like
cat DataAdmin1.conf
Data Administrator's user ID
da_id=DataAdmin1

Data Administrator's first name
da_fname=Adam

Data Administrator's last name
da_lname=Johnson

Data Administrator's email address
[email protected]

Data Administrator's telephone number
da_phone=650-485-1415
Execute the following command to initialize a new Data Administrator:
$ sudo srvg da-add -c /etc/serverg/examples/admins/DataAdmin1.conf
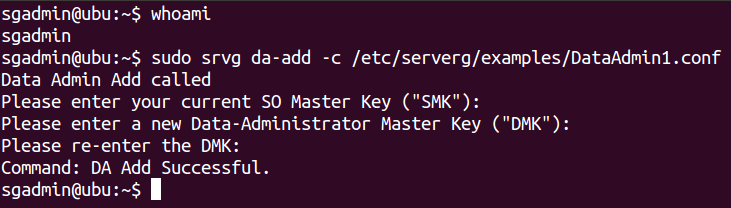
The Security Officer will be prompted to type in their SMK to authenticate herself. The DA must then type in a 16 (or more) character long alphanumeric string as their Data Master Key (DMK).
Note: The DMK is only known to the DA. Each DA will have its own DMK. Multiple DAs are supported on a single server.
The DMK will be used to encrypt data sets that are under the care of a particular DA.
4. Setting up a security policy
4.1 What Is A Data Security Policy?
A security policy is a set of rules that govern the encryption algorithm used to encrypt data, who is going to administer the security policy, what data sets need protection, and which system users are allowed to access the protected data sets. Any authorized DA can add a new security policy for the data set. There are no limits on the number of security policies that can be added by a DA on a single server. More specifically a security policy controls the following attributes:
-
The policy name - you can give any arbitrary name to your policy
-
Information about the responsible DA for the policy.
-
The type of encryption algorithm to be used to protect the sensitive data sets.
-
Information about which directories to encrypt.
-
The name of the application server. Please leave it blank if you are defining a policy to protect a set of flat files.
-
The system users who need access to sensitive files. We call them Server General Users or SGUs.
Here is a sample security policy to secure the MySQL database (/etc/serverg/examples/mysql).
Short name for the security policy
policy_shortname=security_policy_mysql

Data Admin name
da_id=DataAdmin1

Type of ciphers supported: AES, blowfish, Twofish.
cipher=aes

Repositories to protect - in the format:
unencrypted_directory_1,unencrypted_directory_2,...
repo=/var/lib/mysql,/var/log/mysql

app_name=mysql

allowed_users=mysql,sgadmin,ajohnson
You must edit this security policy to enable the system user (or users) to access the MySQL database in cleartext. In this case, we have added the user James Cuts (user-id = “jcuts”). The user exists in the /etc/passwd file and is also part of the group “sudo”.
Note: You don’t need to add this user to the group “sudo” unless the application requires it. In the case of the MySQL database, the user must belong to a group “sudo” to access data stored in /var/lib/mysql. On the other hand, if you are just protecting a set of files within /home/jcuts directory, then you don’t need to give “jcuts” the “root” privileges.
If you grant permission to a user in the security policy, but the user doesn’t exist on the system, then you will get an error message when you try to “add” the policy.
4.2 Add/Enforce the Data Security Policy
You only need to add a specific security policy once. Adding a security policy also enforces it. In other words, when you add a security policy for the first time, the SGA will get hold of your sensitive data files stored in a given directory that was outlined in the security policy, encrypt them, and move them into a cryptographically secure location within your server called a “repository”. There is a one-on-one mapping between a sensitive data directory and its corresponding repository. You can look at these files in your “/vault” directory. You must make sure that you have purchased a subscription plan that is adequate for your needs. You can always add additional repositories to a given license by contacting us.
Note: You should add the system user who needs access to the MySQL database.
$ sudo srvg policy-add -c <policy-file> [-D <da-key>]

Note: Only the authorized Data Administrator who is responsible for a given security policy can add/start/stop a security policy. The DA authentication is done via the DMK.
4.3 Check If The Security Policy Is Working
Log out and close all the shell windows. You must log yourself out completely. Log back in as “jcuts”.
$ ssh jcuts@<IP address of your server>>
$ sudo -i
cd /var/lib/mysql
ls -lt
You’ll see all of the MySQL files listed.
Now logout.
exit
$ exit
Log back in as another system user who is part of group sudo.
$ ssh <user-id>@<IP address of your server>>
$ sudo -i
cd /var/lib/mysql
ls -lt
You’ll see that the directory is empty. It’s because the DA who controls the MySQL data sets has not granted this user access to the protected data sets. This user can not see any files even though s/he is a “root” user.
5. Roles & Responsibilities
Faced with relentless attacks and ever-increasing regulatory compliance requirements, organizations have a new challenge – how to secure digital assets from malicious attacks stemming both from the inside and the outside. Perimeter security devices, such as firewalls, are incapable of dealing with these kinds of threats since they focus on network security and not on data security. Mission-critical applications deployed on “general-purpose” servers that run “off-the-shelf” operating systems are vulnerable. The lack of adequate data security in the operating systems combined with insecure hardware exposes the application servers to ever-increasing malicious activity. To mitigate these challenges and to provide regulatory compliance, the Server General Data Encryption solution leverages role-based access control (RBAC) to separate system and data management domains. This separation ensures that the circle of trust for application data remains small. The entire scope of the administration for the Server General Agent is partitioned among different administrators – each administrator has access to and control over only the aspects of Server General operation required to successfully fulfill their responsibilities.
Here are the main roles:
5.1 Security Officer's Command Set
The Security Officer (SO) is generally a corporate officer of your organization who is completely trusted. The SO is not responsible for the day-to-day management of the SGA. This management responsibility is delegated to a Data Administrator. There is only one Security Officer per server. The Security Officer is responsible for managing other administrators i.e. adding, re-assign responsibilities, and revoking Data Administrators. If a Data Administrator forgets his/her DMK, then the SO can restore access to a protected data set by initializing a new DA and making the new DA responsible for the data set. Please note that the SO is not granted direct access to the protected data sets.
The SO is required to be available during the initial configuration of the Server General Agent. During installation, the SO assigns themselves a unique encryption key that is known as the “Security Officer’s Master Key” or the “SMK”. The Security Officer should write down this key and store it in a safe place. If the SMK is lost, then we will not be able to help you.
5.1.1 Initialize a new Data Administrator
$ sudo srvg da-add -c <config-file> [-D <da-key> -S <so-key>]
Only the SO can add a new DA.

5.1.2 Revoke a Data Administrator
$ sudo srvg da-revoke -r <revoked-da-id> [-S <so-key>]
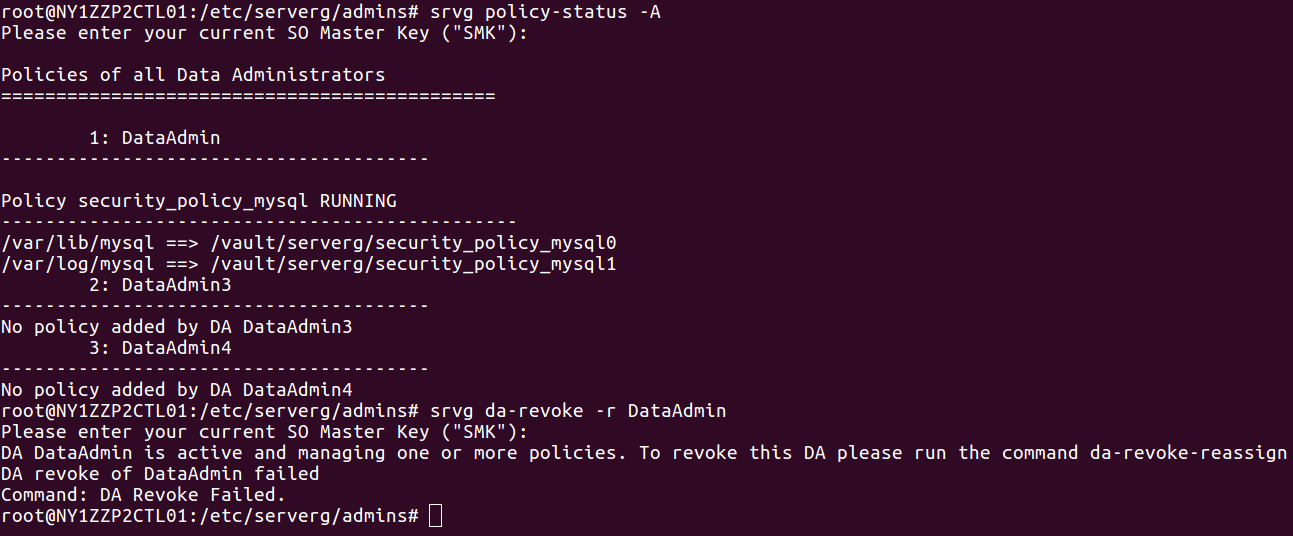
The revocation command will fail if the Data Administrator is actively managing a data set. Therefore revocation necessitates the reassignment of any management responsibilities to another Data Administrator. The SO can revoke a Data Administrator without the Data Administrator’s cooperation. This feature allows the SO to overwrite the DMK of the DA being revoked by the DMK of another DA who is assigned to take on the responsibilities. The data sets managed by a Data Administrator are generally very sensitive, therefore the SO can make use of a single command to revoke a DA. The revocation procedure is immediate and there is no need to decrypt and re-encrypt data sets. The screenshot below lists three Data Administrators. Then the “srvg da-revoke” command is executed to revoke DataAdmin1. The “da-list” command no longer shows DataAdmin1 listed.
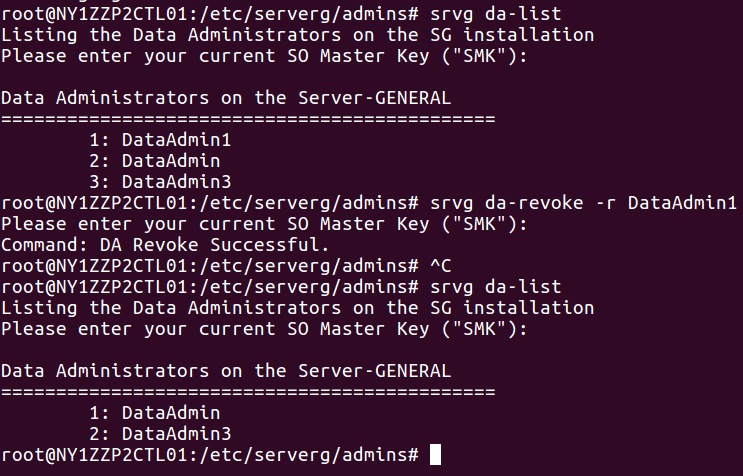
Also due to compliance reasons, you can not re-initialize a Data Administrator who has been revoked. Here we tried to add “DataAdmin1” again but the command was not successful.

Now let’s try to revoke a Data Administrator who is currently responsible for a sensitive data set (in this case MySQL). The Data Administrator’s ID is “DataAdmin”. We’ll attempt to remove this DA. You will see the attempt will fail. However, you can revoke and reassign responsibilities using a single command.
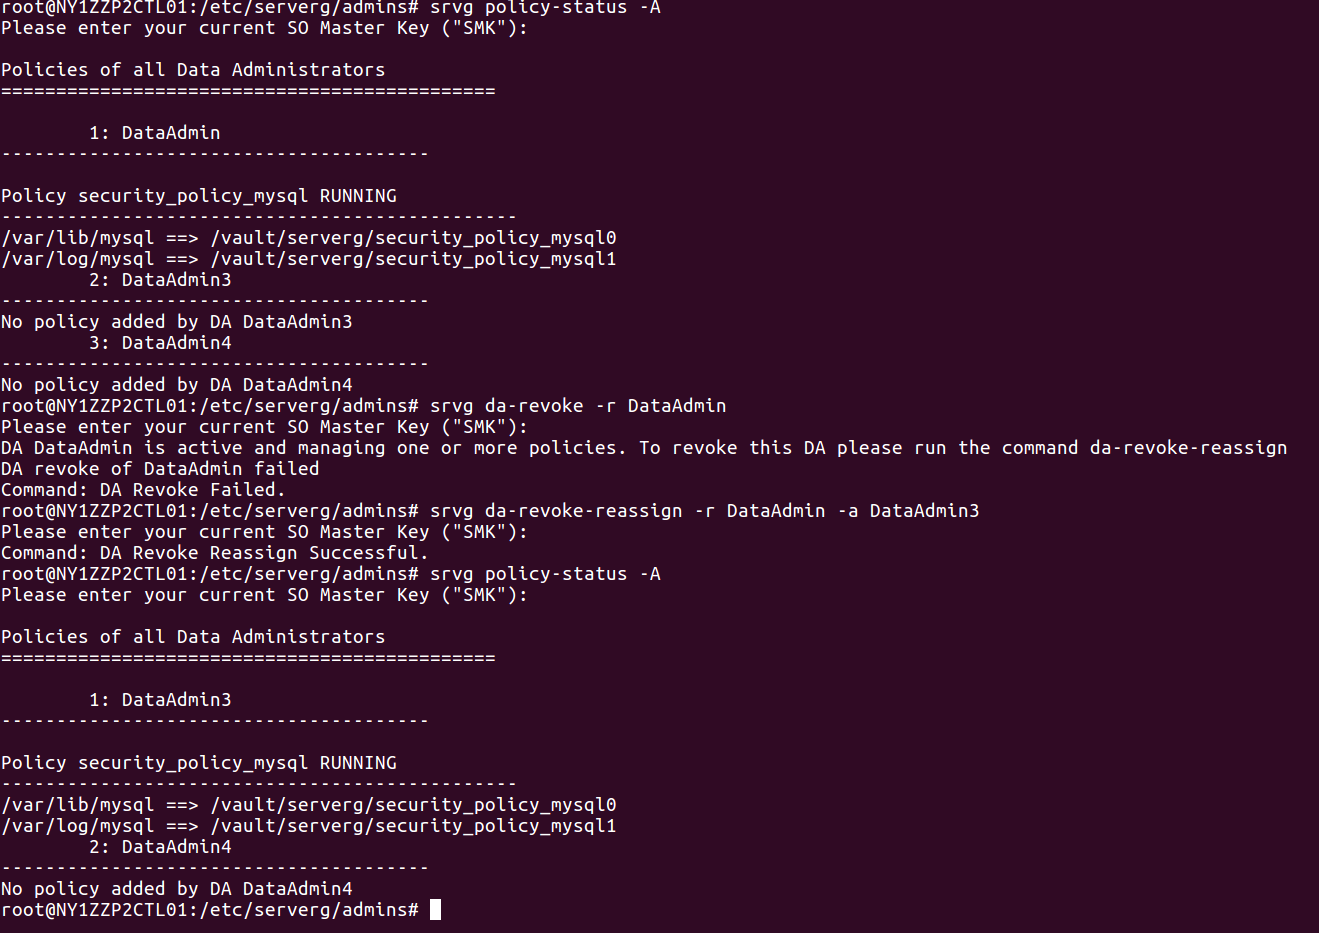
5.1.3 Revocation and re-assignment of a Data Administrator
$ sudo srvg da-revoke-reassign -r <revoked-da-id> -a <assigned-da-id> [-S <so-key>]
The SO can revoke a DA and re-assign management responsibilities to another DA with the above command. The revoked DA gets deleted and the new DA is assigned responsibilities of managing security policies that were previously assigned to the revoked DA. The command does not require decryption and re-encryption of the entire data sets that were under the control of the DA being revoked.
5.1.4 List All Security Policies
$ sudo srvg policy-list -A [-S <so-key> -o <output-fname>]
The Security Officer can list all security policies with a single command. The Data Administrator, on the other hand, can query the status of policies that are under his/her control.
5.1.5 List Security Policies Controlled by a Specific DA
$ sudo srvg policy-list -d <da-id> -t <key-type (SMK|DMK)> [-K <key> -o <output-fname>]
The Security Officer can also list policies that are assigned to a specific DA.
5.1.6 Query Status of a Specific Security Policy
$ srvg policy-status -d <da-id> -p <policy-name> -t <key-type> (SMK|DMK) [-K <key> -o <output-fname>]
The Security Officer can also list a specific policy that is assigned to a specific DA.
5.1.7 Query Status of All Security Policies Administered by a Specific DA
$ sudo srvg policy-status -d <da-id> -t <key-type> (SMK|DMK) [-K <key> -o <output-fname>]
The Security Officer can also list all policies that are assigned to a specific DA.
5.1.8 List All Data Administrators
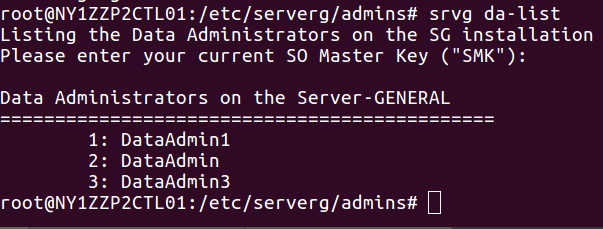
$ sudo srvg da-list [-o <output-file> -S <so-key>]
The Security Officer can list all active Data Administrators.
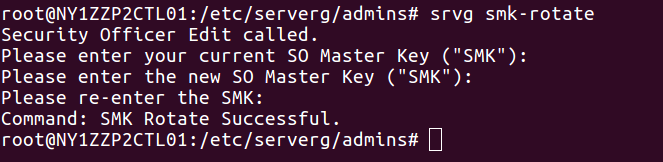
5.1.9 Rotate SMK
$ srvg smk-rotate [-O <old-so-key> -N <new-so-key>]
The Security Officer can rotate his/her key.
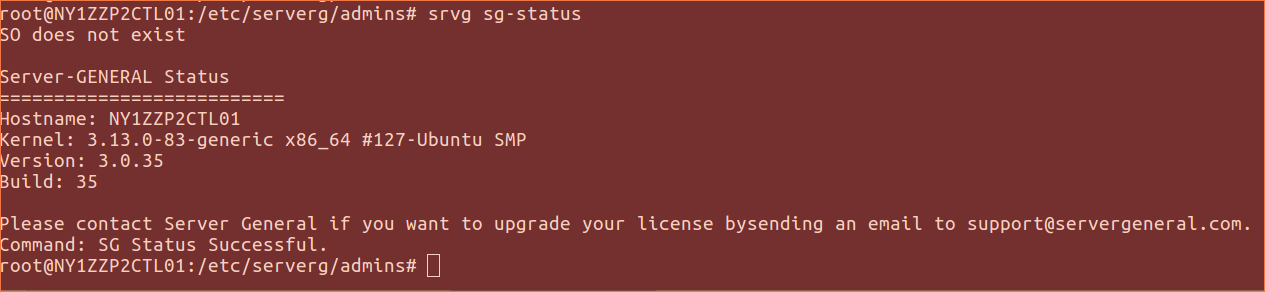
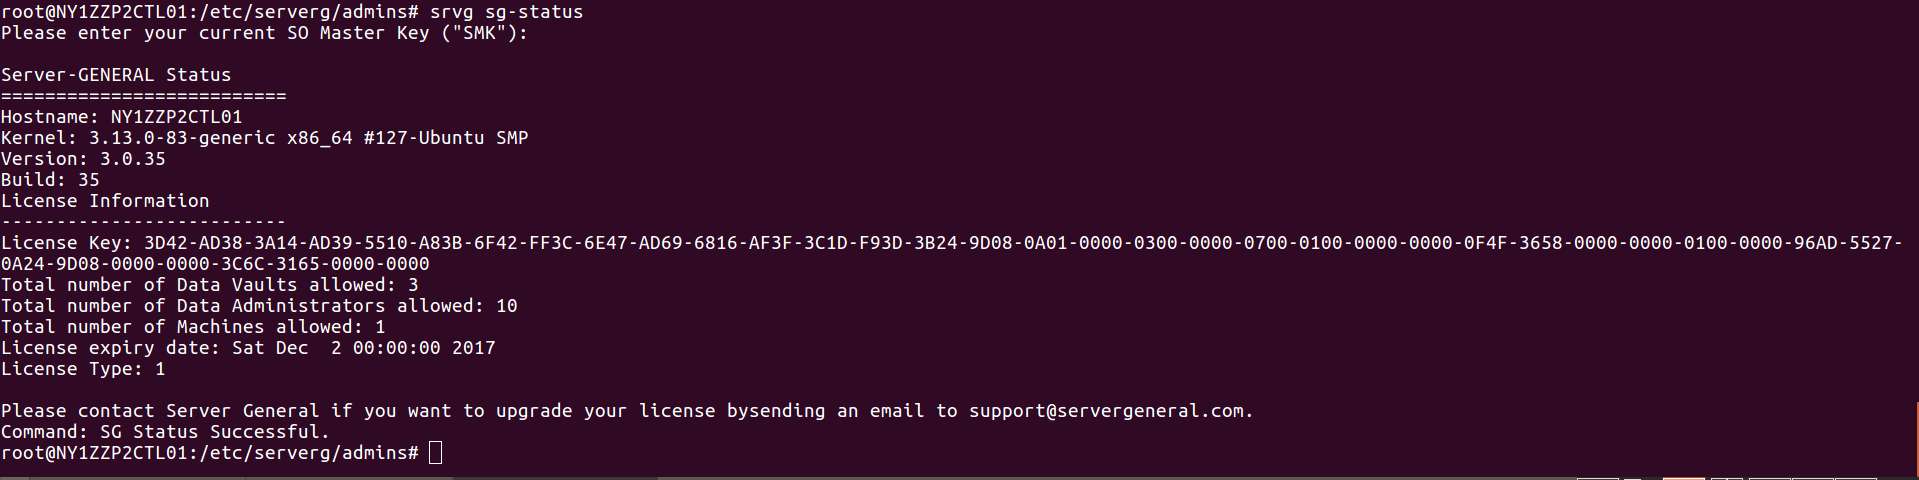
5.1.10 Check Server General Status
$ sudo srvg sg-status [-S <so-key> -o <output-fname>]
This command will allow you to see the current status of your Server General Agent installation. You can make use of this command even if the Security Officer hasn’t been configured. You will get limited information along these lines:
On the other hand when the SO provides his/her credentials then you will see an output like this:
5.2 Data Administrator’s Command Set
A Data Administrator (DA) is responsible for the day-to-day administration of the assigned data set or sets. You can initialize multiple Data Administrators on your server. Only the Security Officer can initialize a new DA. The DA must pick their own Data Master Key (DMK), a passphrase. The DA will be required to use their DMK while executing all operations. For example, the DA will be required to provide their DMK during the creation of a new security policy. Whenever the target server is restarted or rebooted, a DA must present their DMK to enforce their security policies. The DA is also responsible for updating the Server General Agent.
5.2.1 Create a security policy
$ sudo srvg policy-add -c <policy-file> [-D <da-key>]
Short name for the security policy
policy_shortname=security_policy_mysql

Data Admin name
da_id=DataAdmin1

Type of ciphers supported: AES, blowfish, Twofish.
cipher=aes

Repositories to protect - in the format:
unencrypted_directory_1,unencrypted_directory_2,...
repo=/var/lib/mysql,/var/log/mysql

app_name=mysql

allowed_users=mysql,sgadmin,ajohnson
A security policy controls how a particular data set will be protected. Any Data Administrator can create a security policy. All Data Administrators are allowed to create as many security policies as necessary. A security policy stipulates the following:
Short name: The name of the security policy. No two policies on the same server can have the same short name.
Data Admin: The da_id is the id of a Data Administrator. Once a DA has been initialized they can create new security policies to protect any data set on the server. The DA also decides which encryption algorithm to use to encrypt which directories and which system users will be granted access to the protected data sets.
Cipher: This parameter controls the encryption algorithm to be used to encrypt data sets. Even though three different encryption algorithms are available, we suggest that you use “AES” as it’s the strongest encryption algorithm and is the hardest to break.
Repo: To encrypt data we need to know the exact data path where the sensitive data set resides within your server. Server General will create a cryptographic repository within your server to store the encrypted version of your data set. There is a one-to-one correspondence between the directory that is being protected and its corresponding cryptographic repository. Please note that in one policy you can list one or more directories that need to be protected by Server General separated by a comma. However, your subscription license controls the number of repositories that can be created on your server. For example - if you have purchased a subscription license for one repository, then you’ll be able to protect one directory or a data path and all subdirectories underneath it. Please note that access control rules apply to the directory that is being protected and not to subdirectories. So it’s important not to move too far up the tree to maintain tight control over who can access the sensitive data sets.
App_name: The name of the application server that uses the protected directories. For example, if you are using the Server General Data Encryption service to protect your MySQL database, then “app_name” is going to be “mysql”. If no application server will be accessing the protected directories, then you can leave it blank. Server General Agent will attempt to “start/stop” the application server (e.g. mysql server) when you “add/stop/start” a security policy associated with that application server.
On the other hand, if you are protecting flat files within a directory, then you should leave this field empty as no application server needs to be stopped or restarted.
Note: If Server General fails to start a service, then you can manually start it.
Allowed_users: Who will be allowed to access the protected data sets?
This is one of the most important attributes that need to be defined in the security policy. Since the Server General Data Encryption service employs advanced access control mechanisms, you must give access to those system users who need it to perform their duties. Generally speaking, you would want to keep the circle of trust small.
Lastly, it’s critical not to change the syntax of these configuration files. Hence we suggest that you use one of the example security policies and adapt them to your needs. Here is a sample security policy:
Short name for the security policy
policy_shortname=security_policy_mysql

Data Admin name
da_id=DataAdmin1

Type of ciphers supported: aes, blowfish, twofish.
cipher=aes

Repositories to protect - in the format:
unencrypted_directory_1,unencrypted_directory_2,...
repo=/var/lib/mysql,/var/log/mysql

app_name=mysql

allowed_users=mysql,sgadmin,ajohnson
5.2.2 Add a security policy:
A Data Administrator can add a new policy. However, before adding a new policy the DA must make sure that a policy file exists that describes the various attributes of a policy. Once the file is ready, the DA can execute the following command below to enforce the security policy. Upon successful completion of this command, the data stored in the listed directories will get encrypted using the encryption algorithm that has been requested. Advanced access control rules will enforce access to the protected data sets. It’s important to note that the Server General encryption and decryption processes are completely transparent to both the application and the management programs. No changes are required to be made to the application or the data. Here is the command to add a new security policy:
$ sudo srvg policy-add -c <policy-file> [-D <da-key>]
Note: Please ensure that your “/tmp” is twice the size of the data sets you are attempting to protect. This is an absolute requirement since we must maintain two copies of your data sets while encryption or decryption processes run.
5.2.3 Enforce/Start a Security Policy:
Only the responsible Data Administrator of a policy can start or stop enforcement of a given security policy. For the DA to enforce a policy the DA must first create a policy as described earlier. The DA will be required to present their DMK to enforce the policy.
It’s important to note that when you reboot your server you must “start” your security policies again. This provision guards against physical theft of your server and it prevents malicious parties from stealing your information by simply copying your VM hosted within a cloud. So if after a reboot you find that your application suddenly can’t access your MySQL database, you should check the status of your security policy for MySQL. If it’s not running, simply restart the policy to gain access to the protected data sets.
Use the following command to start the policy:
srvg policy-start -p <policy-name> -d <da-id> [-D <da-key>]
“policy-name” = is the “short-name” you assigned in your policy file. In our example policy configuration file for MySQL, we are using “security_policy_mysql” as the policy name.
“da-id” = is the Data Administrator’s ID. In our example, we are using “DataAdmin1” as “da-id” in the MySQL security policy.
5.2.4 List security policies
The Data Administrator can list policies under his/her control by using the following command:
$ srvg policy-list -d <da-id> -t <key-type (SMK|DMK)> [-K <key> -o <output-fname>]
5.2.5 Remove a security policy
For security reasons, only the responsible Data Administrator is allowed to execute this command. Upon execution of this, all manners of protection offered by Server General will be removed. Your encrypted data sets will get decrypted and no advance access control mechanisms will remain in place. You will need to execute this command when:
-
you want to re-encrypt your sensitive data sets with the help of another encryption algorithm or
-
when you want to uninstall Server General.
$ sudo srvg policy-remove -p <policy-name> -d <da-id> [-D <da-key>]
Note: This command might take some time to finish if you have a very large data set that needs to be decrypted.
5.2.6 Display current policy status
Only the authorized Data Administrator can list the current status of a given policy.
srvg policy-status -d <da-id> -p <policy-name> -t <key-type> (SMK|DMK) [-K <key> -o <output-fname>]
da-id = The Data Administrator’s ID who is responsible for this security policy.
policy-name = The “policy-name” is the name that is assigned in the policy configuration file.
key-type = The “key-type” is “DMK” (only the SO can use the SMK)
srvg policy-status -d <da-id> -t <key-type> (SMK|DMK) [-K <key> -o <output-fname>]
5.2.7 Changing Data Administrator’s Information
An authorized administrator can make changes to his/her information. The following information can be changed:
da-id = Data Administrator’s id
da_fname = First name
da_lname = Last name
da_email = Email address
da_phone = Telephone number
srvg da-edit -d <da-id> [-D <da-key> -F <fname> -L <lname> -E <email> -T <phone>]
6. Operational View
6.1 Server General Operational View
The Server General security policy is defined by a Server General Data Administrator (DA). Please refer to the section “Enforce/Start a Security Policy” to configure a new policy. If you want to view what policies have been defined, then you should look at the /etc/serverg/serverg.conf file. This file has authoritative information about your Server General configuration. You should never manually edit this file. Never.
6.1.1 Patching/Updating Your Server
Always try to update your server when logged in as the “sgadmin” user. In case your hosting provider is updating your machine as the “root” user, then please make sure that they do not try to restart the MySQL server as “root”. This happens very often for customers who are hosted at Rackspace and it must be avoided. Only the “sgadmin” user is authorized to restart the MySQL server via the policy-start command -
$ sudo srvg policy-start -p <policy-name> -d <da-id> [-D <da-key>].
<policy-name> - it is the name that you assigned to your security policy when you configured it. For example in the following /etc/serverg/serverg.conf the name of the security policy is “security_policy_mysql”:
[security_policy_mysql]

da_id=DataAdmin1

cipher=aes

app_name=mysqld

repo=/var/lib/mysql,/vault/serverg/security_policy_mysql0

repo=/var/log/mysql,/vault/serverg/security_policy_mysql1

allowed_users=mysql,sgadmin

[\security_policy_mysql]
The <da-id> is “DataAdmin1”. Hence the command that is required to be used to start this security policy is:
$ sudo srvg policy-start -p security_policy_mysql -d DataAdmin1
This command will bring up the mount point controlled by your Server General security policy and then start the MySQL server. In case the command fails to start the MySQL server it’ll inform you and request you to start the server manually.
6.1.2 Policy Restart Required After a Reboot
Whenever your server is rebooted you must restart your Server General security policies that have been configured for that server. This step is required to prevent a malicious user from copying your data partition and mounting it onto another machine to steal your data. Also, remember that only the “sgadmin” user should start the Server General policy. If the “root” user tries to “su” to the “sgadmin” user and then tries to restart the Server General policy, then you will certainly encounter serious problems. Server General will prevent the “root” from starting the policy.
6.1.2 Stopping a Server General Security Policy
You can stop the above-mentioned security policy via this command:
$ sudo srvg policy-stop -p security_policy_mysql -d DataAdmin1
Once you finish executing this command successfully you will notice that there are no files in “/var/lib/mysql” or in “var/log/mysql”. However, your data is still safely stored on the server in “/vault” in the encrypted format. This technique can be used to protect data stored in a sensitive file that is not needed all the time e.g. your credentials.
6.1.3 Removing a Server General Security Policy
Sometimes you might want to remove an existing policy. This can be easily done via the following command:
$ sudo srvg policy-remove -p <policy-name> -d <da-id> [-D <da-key>]
You will have to remove all of your security policies in case you are trying to uninstall the Server General agent.
6.1.4 Checking the Status of a Server General Security Policy
If you want to check the status of a running policy then you can easily do so via the following command (this command will show you the status of a sample MySQL security policy):
$ sudo srvg policy-status -d DataAdmin1 -p security_policy_mysql
7. Key Management
Overview:
The National Institute of Standards and Technology (NIST) has set the gold standard for key management. An ideal key management system must support processes that ensure that keys are strongly protected and are available when needed. Our service eliminates the complexity associated with managing keys while maintaining the highest standards of security and availability.
We understand that key management is perhaps the most critical component of any encryption system and many small to medium-sized enterprises don’t have the knowledge or the desire to build a highly secure and highly available key management infrastructure. That is exactly where we step in. Our encryption agent installed on your server is designed to communicate with our key lockers. The lockers are deployed within our cloud. Your data encryption keys are wrapped in an additional layer of encryption. To unwrap this layer you need the master passphrase that is only known to you.
Note: Please note that we do not store the actual encryption key in our lockers. Only the cipher value of your data encryption key is stored in our lockers. In order to reconstitute the actual encryption key an authorized Server General administrator within your organization must provide a valid passphrase that is only known to them. This way a successful compromise of our key locker can not result in the disclosure of the actual encryption key.
Our key lockers are managed by professionals on a 24x7x365 basis to ensure availability and security. Our key management infrastructure is highly redundant and can withstand multiple failures. On the other hand, if you have opted for an on-premises key locker solution, then we highly recommend that you deploy at least two key lockers.
With Server General, you are always in charge of your own keys:
-
Only an authorized Data Administrator can reconstitute his/her master encryption key.
-
Keys can be stored in an on-premises key locker (a secure and managed appliance) or within our cloud key management infrastructure.
-
Members of our staff can not read your encryption keys no matter where you store them.
Details:
The security of any cryptography-enabled system ultimately depends on the security of the cryptographic material used. Key generation, storage, distribution, rotation, and revocation are all critical aspects of any distributed key management system. Although many different and sometimes competing ways of managing keys exist, it is ultimately the available resources and threat environment that dictate the choices. Server General is a data encryption and key management service that consists of two components - the Server General Agent (SGA) and the Server General Locker (SGL). The SGL is a secure appliance used to store keys. A single SGL can store an unlimited number of encryption keys. Our customers can use our global key management infrastructure to store their keys.
Here is how it works:
When the user installs the Server General Agent on the target server at least two administrators are configured - a Security Officer (SO) and a Data Administrator (DA). The DA acts as the custodian of the sensitive data sets and uses her key (DMK) to encrypt data. We encrypt the DMK (the data encryption key) with a passphrase that is only known to the DA. The Server General Agent moves the cipher value of the data encryption key, and not the actual encryption key, into the SGL. We use AES-128 in CBC mode to encrypt data as well as the data encryption key (DMK).
7.1 Generation
To reduce the risk of a potential compromise a key must be long and should be generated in a truly random fashion i.e. have sufficient entropy to guard against brute force attacks. Hence the Server General Agent uses 256-bit long keys that are generated in a truly random fashion.
7.2 Storage
Keys must be stored at a location that provides sufficient protection against attacks launched by malicious entities as well as by automated tools. Hence we use a hardened appliance that is built-in to withstand attacks stemming from the outside as well as from the inside. We use a key wrapper, also known as Key Encryption Keys or KEK that is used to encrypt the actual encryption keys before the data encryption key is stored in our key locker. This mitigates the danger that stems from a successful compromise of our key lockers and also safeguards against our staff being able to access your keys.
7.3 Distribution
Utmost care must be taken during the distribution of the keys. Many times keys are exchanged out-of-band or via the use of some other methodology. We, on the other hand, install an agent on the server that sets up encrypted tunnels with its designated key lockers. After a proper handshake, the agent transparently moves the keys into key lockers using encrypted tunnels (https). We do require that each and every administrator be present during the installation of the agent because they will have to generate their own encryption key.
7.4 Key Use
The encryption keys must not only be stored in a secure environment but they must also be protected while they are in use. The Server General key storage is designed with this in mind. Only the data owners remain in full and absolute control of their own keys at all times.
Our agent (the SGA) installed on the target server receives all encryption and decryption requests. Before unlocking the cryptographic space that stores sensitive files, the SGA authenticates the requesting party. After the successful completion of the authentication request, the SGA sends a request to the appropriate key locker on behalf of the requesting party. The locker then sends back an encryption key that is wrapped within another layer of encryption, also known as the key encryption key (KEK). The SGA decrypts the KEK with the help of the requesting party who must provide the master key. It’s important to note that only the encrypted keys are stored in our key lockers.
7.5 Rotation
The idea behind key rotation is to limit the possibility of a successful breach. The thinking is that if the same key remains in use for a long period, then in theory the attacker has more of a chance to compromise it. So many regulations and industry mandates require keys to be rotated periodically. The biggest issue with key rotation is that it requires decryption and re-encryption of the associated data sets. This can take a very long time if the data sets are large. The Server General Data Encryption service allows each DA to rotate their Data Master Key or the DMK whenever they like. The DMK is used to encrypt the file encryption keys. Since no user has access to the actual file encryption keys, rotating the DMK (the only key that the user knows) sufficiently mitigates the risk without having to incur the encryption/decryption penalty of the entire data set.
7.6 Back-up
Once data has been encrypted it is vital to make sure that it can be decrypted when needed. Hence it is absolutely critical to ensure the availability of the key. To safeguard against the loss, keys must be replicated. Moreover, if the data is being backed up for archival purposes, it becomes even more important to have a lifetime key management policy in place. This is what the Server General Data Encryption service brings to the table. We have set up a highly secure and available key management infrastructure that can withstand multiple failures. Please remember no keys are stored anywhere unless they have been wrapped up in another layer of encryption (KEK). Only our customers can decrypt the outer layer using their master key.
7.7 Recovery
In case a DA leaves the company or somehow loses his/her DMK, the SO can always initialize a new DA and assign the data management responsibilities to the new DA. This can be done without having access to the original key. However, if the SO’s key is lost, then we are unable to help. For security reasons we have made no provisions to get back in and make changes in any manner to be able to recreate the SO key again. Therefore we recommend that the SO key (SMK) must be written down and stored in a safe and secure location.
Logging
All Server General operations conducted by the administrators are logged locally in the /var/log/serverg/serverg.log file. These logs can be redirected to a centralized server. Please refer to your SEIM vendor’s documentation to see how this can be accomplished. However, in order to provide non-repudiation and to comply with various regulations we also store logs on our logging servers away from the reach of any administrator. These logs are used to generate real-time alerts. We also log Server General commands in our logging servers in order to generate tamper-resistant logs. This feature comes in handy during a compliance audit or if the attacker has somehow compromised the host server and has been able to alter the log file stored in /var/log/serverg.
Uninstalling Server General
The Server General Agent or the SGA can be uninstalled very easily.
Steps to uninstall the SGA:
-
Log in as the “sgadmin” user.
-
Remove all security policies with the help of the following command:
srvg policy-remove -p <policy-name> -d <da-id> [-D <da-key>]
- Use Server General uninstall command:
# srvg sg-uninstall
- Remove the “sgadmin” user. Please note once this user has been removed, you will not be able to execute any SGA commands.
exit
$ exit
Log back into the machine as any other than the “sgadmin” user.
$ sudo -i

# userdel -r -f sgadmin
Please make sure that there are no files in /etc/serverg directory.
Troubleshooting
Appendix 1: MySQL
How to encrypt MySQL data?
You can use the following steps to encrypt your MySQL data and enjoy the benefits of advanced access control mechanisms to limit the access of the “root” user:
Assumptions:
-
You already have a MySQL server installed on your target server.
-
You already know which system users need access to the MySQL database.
-
You have access to our Quick SGA Start Guide (QSG).
-
You have access to a valid SGA agent subscription license.
-
You have credentials to log into our customer portal (www.servergeneral.com).
Steps:
-
Download “sga-install” from www.servergeneral.com.
-
Download the “sga-install” file that is suitable for your target server.
-
Make sure that sga-install is executable. If it’s not, then change permissions:
$ sudo chmod +x sga-install.sh -
Install the SGA on your target server:
$ sudo ./sga-install
- Save the private for the user “sgadmin” on your own workstation, name it (id_des), and change file permissions:
# chmod 400 id_des
- Delete the private key from your target server:
rm /home/sgadmin/.ssh/id_des
7. Log in to the target server as the “sgadmin” user using the private key that you just saved on your workstation:
$ ssh -i <path to your id_des key> sgadmin@<IP address of your target server>
$ whoami
It should say “sgadmin”.
- License your SGA:
$ sudo srvg license-add
- Add Security Officer after you edit the /etc/serverg/examples/security_officer.conf using this command:
$ sudo srvg so-add -c /etc/serverg/examples/security_officer.conf
- Add Data Administrator for the MySQL data after you edit the /etc/serverg/examples/security_officer.conf using this command:
$ sudo srvg da-add -c /etc/serverg/examples/DataAdmin1.conf
- Add the MySQL security policy after you edit /etc/serverg/examples/security_policy_mysql file using the following command:
$ sudo srvg policy-add -c /etc/serverg/examples/security_policy_mysql
Test your installation:
-
Make sure that nobody is logged into your target server.
-
Log into the target server as any user other than the “sgadmin” user. To check the advanced access control mechanisms are working properly, you must log into the target server as a user who has not be granted access to the MySQL database within the security policy but the user must be part of the group “sudo”. Let’s assume the user is “mpatton”.
$ ssh -i <path to the private key for the user “mpatton”> mpatton@<IP address of the target machine>
or
$ ssh mpatton@<IP address of the target machine> (if you are not using a key pair for this user).
$ sudo -i
cd /var/lib/mysql/mysql 16
You will find that there are no files stored in this directory
- Now try to log into your mysql server as an authorized MySQL user. You’ll use a MySQL command something like this:
mysql -u<a valid mysql user-id> -p<password> <database name>; show tables; 18
The command list all the database tables that exist within your MySQL database.
- This shows that the advanced access control mechanisms are working. Even the “root” user was not able to view the protected data sets whereas you are able to continue to access the MySQL database as if nothing has changed.
Where are my encrypted data sets?
- Your encrypted data sets are stored in /vault.
Appendix 2: I Can Not Find My Protected Data Sets. What happened?
- Did you just reboot your machine?
If you reboot your machine, then you have to restart the security policy for the data set. This command must be executed as the “sgadmin” user and by the responsible Data Administrator since it requires the administrator to type in the associated DMK.